The next picture shows where we are starting, as usual the square to be added is worked until the first corner 2 DC chain 1. In the picture below we will be joining the bluebell square on from point A to point B. It may be helpful to place a marker on the centre DC of the purple square as this stitch lines up with the seam and not either of the squares.
 |
| Picture 1. Where we start. |
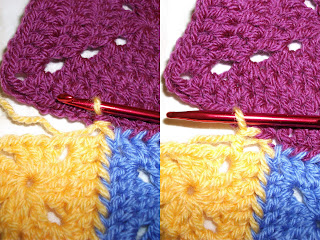
Now to connect the first chain, as in earlier parts; lengthen the loop on your hook, remove hook, place hook through chain on purple square (both loops), pull the working loop through, snug the loop back to size, now chain 1, shown in Picture 2.
 |
| Picture 2. To the left loop connected, to the right chain made. |
Now we can connect the first DC; lengthen the loop on your hook, remove hook, place hook through stitch on purple square (both loops), pull the working loop through, snug the loop back to size, DC in blue square, shown in Picture 3.
 |
| Picture 3. |
Next the 7th DC; lengthen the loop on your hook, remove hook, place hook through stitch on purple square (both loops), pull the working loop through, snug the loop back to size, DC in blue square, shown in Picture 4.
 |
| Picture 4. |
For right now carry on as normal connecting the first of the two chains to this centre stitch as follows; lengthen the loop on your hook, remove hook, place hook through centre stitch on purple square (both loops), pull the working loop through, snug the loop back to size, chain 2 in bluebell square, shown in Picture 5.
 |
| Picture 5. |
That's the bluebell square joined on, you can carry on as normal to finish it, shown in picture 6.
 |
| Picture 6. |
Now on to the second square, which is joined from point A to point B then from point B to point C (picture 7).
 |
| Picture 7. |
The first chain; lengthen the loop on your hook, remove hook, place hook through chain on bluebell square (both loops), pull the working loop through, snug the loop back to size, now chain 1, shown in Picture 8.
 |
| Picture 8. |
The first DC; lengthen the loop on your hook, remove hook, place hook through stitch on bluebell square (both loops), pull the working loop through, snug the loop back to size, DC in yellow square, shown in Picture 9.
 |
| Picture 9. |
The last DC; lengthen the loop on your hook, remove hook, place hook through stitch on bluebell square (both loops), pull the working loop through, snug the loop back to size, DC in yellow square, shown in Picture 10.
 |
| Picture 10. |
 |
| Picture 11. |
The second corner chain, this is the one I mentioned earlier, this needs to be connected to the same stitch as the corner chain of the bluebell square. So look at the centre stitch on the purple square, you should be able to see that it already has something going through it, make sure this is the place you connect your chain to as you will run out of space otherwise. So, lengthen the loop on your hook, remove hook, place hook through centre stitch on purple square (both loops), pull the working loop through, snug the loop back to size, now chain 1, shown in Picture 12. At this point on the purple square you should have 7 DC available to connect to in order to complete the joining process.
 |
| Picture 12. |
The first DC of the second side; lengthen the loop on your hook, remove hook, place hook through stitch on purple square (both loops), pull the working loop through, snug the loop back to size, DC in yellow square, shown in Picture 13.
 |
| Picture 13. |
The last DC; lengthen the loop on your hook, remove hook, place hook through last stitch on purple square (both loops), pull the working loop through, snug the loop back to size, DC in yellow square, shown in Picture 14.
 |
| Picture 14. |
The corner chain; lengthen the loop on your hook, remove hook, place hook through first chain on purple square (both loops), pull the working loop through, snug the loop back to size, chain 2 in yellow square, shown in Picture 15.
 |
| Picture 15. |
 |
| Picture 16. |
Back to Joining Index.
Have Fun!

No comments:
Post a Comment