Monday 31 January 2011

Fish

OK, so not the kind you can eat but Inklingo-able ones lol.  After I bought the Inklingo CD 1 and 2 I played around with some of the shapes to add to my Hexagon Layout collection.  The CD gave half hexagons, thirds and quarters so I had lots to play with.  So far I have at least 10 new layouts, however I can't figure out how to draw them in Electric Quilt so can't make a nice slide show like I did before.  My plan is to make a 20 inch block of each layout, they will either be made into cushions or a quilt.  Whichever way they end up being used I can see me doing sashing and using a quilt as you go method.

Here's me playing around with paper shapes to see what I came up with.

Fish Layout

Here's is one lonely fish.

A single Fish

And here he is with some of his mates.

A school of Fish

Each little fish doesn't take too long to make and is so easy using Inklingo for matching the corners up (I'm quite bad at corner matching normally).

Have Fun!

Wednesday 26 January 2011

Double Four Patch

Some time ago I started a scrappy quilt using a block called a four patch (shown below) I have recently gone back to this block and come up with some new (to me anyways ) ideas.  Like the Tetris layouts I can see this being done either by crochet or by patchwork.

Here is the basic block.
Double Four Patch Basic Block

A standard layout with the basic block.

Double Four Patch Standard Layout

A rainbow coloured Trip Around the World

Double Four Patch Trip Around The World

Many Trips Around the World, rainbow style.

Double Four Patch Many Trips Around The World

A rainbow.

Double four Patch Rainbow

Another Rainbow

Double Four Patch Rainbow

Tetris Layouts

A while back I was bored and played around with some coloured pencils and square paper.  I came up with a design that reminded me of a Tetris block.  I can see me making this by either patchwork or by crochet.


This first one is the layout I started with, I wasn't sure if I should include the black stripes or not.

Tetris Rainbow

Here it is with the black background stripes removed.

Tetris Rainbow Take Two

An alternate colour scheme?

Tetris Fall

Sunday 23 January 2011

Babette Construction - Section Three

The start of the blanket was easy, now we get onto something a bit harder but not by much.  I was intending to take pictures of all the joins so that others could follow it.  This was due to the Babette having different sized squares and others using my joining method may cause confusion as to where to start and stop each join.  However, I do almost all of my crochet in the evenings which makes for bad photos.  I also realised that the photos I was taking were not going to help anyone at all.  Having decided not to go into as much detail as I had planned to meant I could work a lot quicker and enjoy the process more without having to think about when to stop to take a picture.

The Squares
2.39 - Shrimp and Saffron
2.40 - Saffron and Meadow
4.32 - Shrimp and Saffron
4.33 - Matador and Shrimp
4.34 - Shrimp and Saffron
4.35 - Shrimp and Saffron


Construction Order
I'm going to start at the right hand side and work as follows; 2.30 ; 2.40 ; 4.35 ; 4.34 ; 4.33  4.32

Section 3

I'am happy about this project so far, it hard to see how its going to look compared to the plan I did a while back but the first new colours are coming in briefly in this section - the green.  I also like how each section is going together quickly.  Although as I get futher in I guess it will take ages as the later sections have a lot of squares.

Its nice how after each bit theres nothing else to do as it joined as I go, and I really love the air crochet technique I came across in Ravelry recently.

I like this pattern and at this point would like to do a granny style one, nneed to figure out colours though as I like working to a chart :)

Have Fun!

Friday 21 January 2011

Hexagons

This is a test.


Thursday 20 January 2011

Monday 10 January 2011

My first Toe!

I only learned to knit last year, and having found Ravelry I wanted to try to knit socks.  So heres a picture of a sample toe I made recently, its in DK weight so its too big for anyone I know, but it did show me I could make a toe.

my toe

Next up, lets see if I can make a heel!

Have Fun!

Rainbow Stripe


Rainbow Stripe
Originally uploaded by ellensmum

This is a blanket that will just be for me, made from my Random Waves Pattern I blogged about earlier.

Saturday 8 January 2011

Part Five – Joining Multiple Smaller Squares onto a Larger One

Right, the last part, as in part 4 of this series I am going to skim past some of the stitches to be joined.  The reason being that by now (this assumes you have read the other parts in the series first and not just started here) you don't need every picture, just the start and end of the joins.  If you haven't already go back to the start and work through all the other parts of the series, if you are only working with same size squares then you only need part one and not this one.


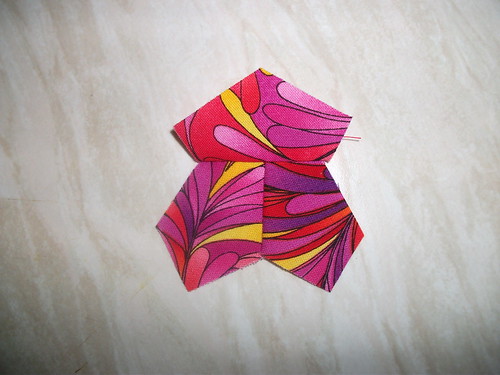
The next picture shows where we are starting, as usual the square to be added is worked until the first corner 2 DC 
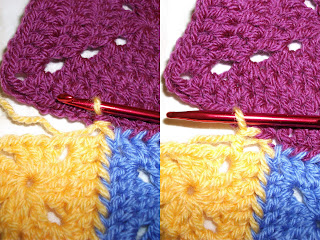
chain 1.  In the picture below we will be joining the bluebell square on from point A to point B.  It may be helpful to place a marker on the centre DC of the purple square as this stitch lines up with the seam and not either of the squares.

Picture 1. Where we start.

Now to connect the first chain, as in earlier parts; lengthen the loop on your hook, remove hook, place hook through chain on purple square (both loops), pull the working loop through, snug the loop back to size, now chain 1, shown in Picture 2.

Picture 2. To the left loop connected, to the right chain made.

Now we can connect the first DC; lengthen the loop on your hook, remove hook, place hook through stitch on purple square (both loops), pull the working loop through, snug the loop back to size, DC in blue square, shown in Picture 3.

Picture 3.


Next the 7th DC; lengthen the loop on your hook, remove hook, place hook through stitch on purple square (both loops), pull the working loop through, snug the loop back to size, DC in blue square, shown in Picture 4.

Picture 4.
Now for the chains at point B (shown in picture 1).  Point B is the centre stitch on the purple square and as discussed in part 4 of this series, this stitch lines up with the seam between this square and the next one.  As we complete both this square and the yellow one (which is coming up next) a chain from each of the bluebell and yellow squares will be joined to the centre stitch - yes both of them. 

For right now carry on as normal connecting the first of the two chains to this centre stitch as follows; lengthen the loop on your hook, remove hook, place hook through centre stitch on purple square (both loops), pull the working loop through, snug the loop back to size, chain 2 in bluebell square, shown in Picture 5.

Picture 5.

That's the bluebell square joined on, you can carry on as normal to finish it, shown in picture 6. 

Picture 6.

Now on to the second square, which is joined from point A to point B then from point B to point C (picture 7).

Picture 7.

The first chain;  lengthen the loop on your hook, remove hook, place hook through chain on bluebell square (both loops), pull the working loop through, snug the loop back to size, now chain 1, shown in Picture 8.

Picture 8.

The first DC; lengthen the loop on your hook, remove hook, place hook through stitch on bluebell square (both loops), pull the working loop through, snug the loop back to size, DC in yellow square, shown in Picture 9.

Picture 9.

The last DC; lengthen the loop on your hook, remove hook, place hook through stitch on bluebell square (both loops), pull the working loop through, snug the loop back to size, DC in yellow square, shown in Picture 10.

Picture 10.
Tthe first corner chain; lengthen the loop on your hook, remove hook, place hook through chain on bluebell square (both loops), pull the working loop through, snug the loop back to size, now chain 1, shown in Picture 11.

Picture 11.

The second corner chain, this is the one I mentioned earlier, this needs to be connected to the same stitch as the corner chain of the bluebell square.  So look at the centre stitch on the purple square, you should be able to see that it already has something going through it, make sure this is the place you connect your chain to as you will run out of space otherwise.  So, lengthen the loop on your hook, remove hook, place hook through centre stitch on purple square (both loops), pull the working loop through, snug the loop back to size, now chain 1, shown in Picture 12.  At this point on the purple square you should have 7 DC available to connect to in order to complete the joining process.

Picture 12.


The first DC of the second side; lengthen the loop on your hook, remove hook, place hook through stitch on purple square (both loops), pull the working loop through, snug the loop back to size, DC in yellow square, shown in Picture 13.

Picture 13.

The last DC; lengthen the loop on your hook, remove hook, place hook through last stitch on purple square (both loops), pull the working loop through, snug the loop back to size, DC in yellow square, shown in Picture 14.

Picture 14.

The corner chain;  lengthen the loop on your hook, remove hook, place hook through first chain on purple square (both loops), pull the working loop through, snug the loop back to size, chain 2 in yellow square, shown in Picture 15.

Picture 15.
Now you can complete the yellow square as normal, which should look like picture 16.

Picture 16.
I hope that all made sense, if not please leave a comment and I will try to fix it.

Back to Joining Index.

Have Fun!

Monday 3 January 2011

Joining Squares Part Four - T Style Join


In this tutorial we will be joining the purple square onto the smaller ones as shown above.  A brief talk about the maths involved in this join.  The red and yellow squares both have 7 DC on there edges, but the purple one has 15.  For ages I couldn't figure this out until I realised that the seam between the red and yellow squares takes up the space of a DC on the purple square.  This just means that the central DC on the joining edge of the purple square is joined a little differently.

You should be familiar with the joining process  from the other tutorials in this series, here.  So lets begin as always, get to the first corner of the purple square, 2 DC, chain 1.

Picture 1. Start

Now lengthen the loop, remove your hook, insert the hook down through the left most chain of the red squares right hand corner in picture 1, pull the working loop through, snug the loop, make 1 chain.

Picture 2. To the left the loop connected, to the right 1 chain made.
Now we need to make a DC into the corner of the purple square, lengthen the working loop and remove the hook, insert hook through 1st DC on red square, pull the working loop through, snug loop back down, make DC into corner space of purple square.

Picture 3. To the left the loop connected, to the right the DC made.

The 2nd DC of the corner is made the same way, lengthen the working loop and remove the hook, insert hook through 2nd DC on red square, pull the working loop through, snug loop back down, make DC into corner space of purple square.

Picture 4. To the left the loop connected, to the right the DC made.
Now join and connect the next five DC's of the purple square so that you have made 7 DC's in total, this is the same as we have done in previous joins, the next stitch is the 8th DC in total.  When you have made the five DC's stop.  The 8th stitch is the extra stitch I mentioned earlier which in theory connects to the seam between the red and yellow squares.  So when you connect the loop for this stitch you connect it to the unused chains in the corners of the red and yellow squares.

So lengthen the loop and remove your hook, insert your hook down through the unused corner chain of the red square and pull the working loop through, now insert your hook through the unused corner chain of the yellow square and pull the loop through.  Now you can snug the working loop down to close the gap and make the 8th DC of the purple square.

Picture 5. To the left the loop connected, to the right the DC made.

From here you can complete the join as in earlier tutorials, there are 7 DC in total left to make.  The next 3 pictures show the corner stitches made.

For the first of the corner DC, lengthen the working loop and remove the hook, insert hook through DC on yellow square, pull the working loop through, snug loop back down, make DC into corner space of purple square.

Picture 6. To the left the loop connected, to the right the DC made.

 For the second of the corner DC, lengthen the working loop and remove the hook, insert hook through DC on yellow square, pull the working loop through, snug loop back down, make DC into corner space of purple square.
 
Picture 7. To the left the loop connected, to the right the DC made.

The last thing to do with the join is the corner chains, lengthen the working loop and remove the hook, insert hook through first corner chain on yellow square, pull the working loop through, snug loop back down, make 2 chains.

Picture 8. To the left the loop connected, to the right 2 chain made.

Now continue to make the purple square as normal.

Picture 9. The right side, the wrong side.
 Back to Join Index