This doesn't have to be two round squares, they can be any size you want them to be. I reckon you could use this in other places too I just haven't thought about it yet. As I'm moving shortly I wont be able to post more than one way at the moment.
US Terminology
Hook used - 4mm
Yarn Used - scrap dk acrylic
Round 1
I start with a magic ring, but you don't have to, so into the ring, chain 3, dc, (chain 2, 3dc) 3 times, chain 2, 1 dc into the ring, ss to top of chain 3 to end the round. Thats the start of your average granny square.
Round 2
chain3, dc in next dc, * (2dc, chain1, 2dc) in corner space, dc in each of next 3 dc * repeat from * to * 3 times, then (2dc, chain1, 2dc) in corner space, dc in next dc, Slipstitch in top of chain 3 to close the round. fasten off and weave in your ends.

Second Square - Joining on One Side
Now, start a second square by completing round one as before, then begin round 2 with chain 3, dc in next dc, 2dc chain 1 in corner space.
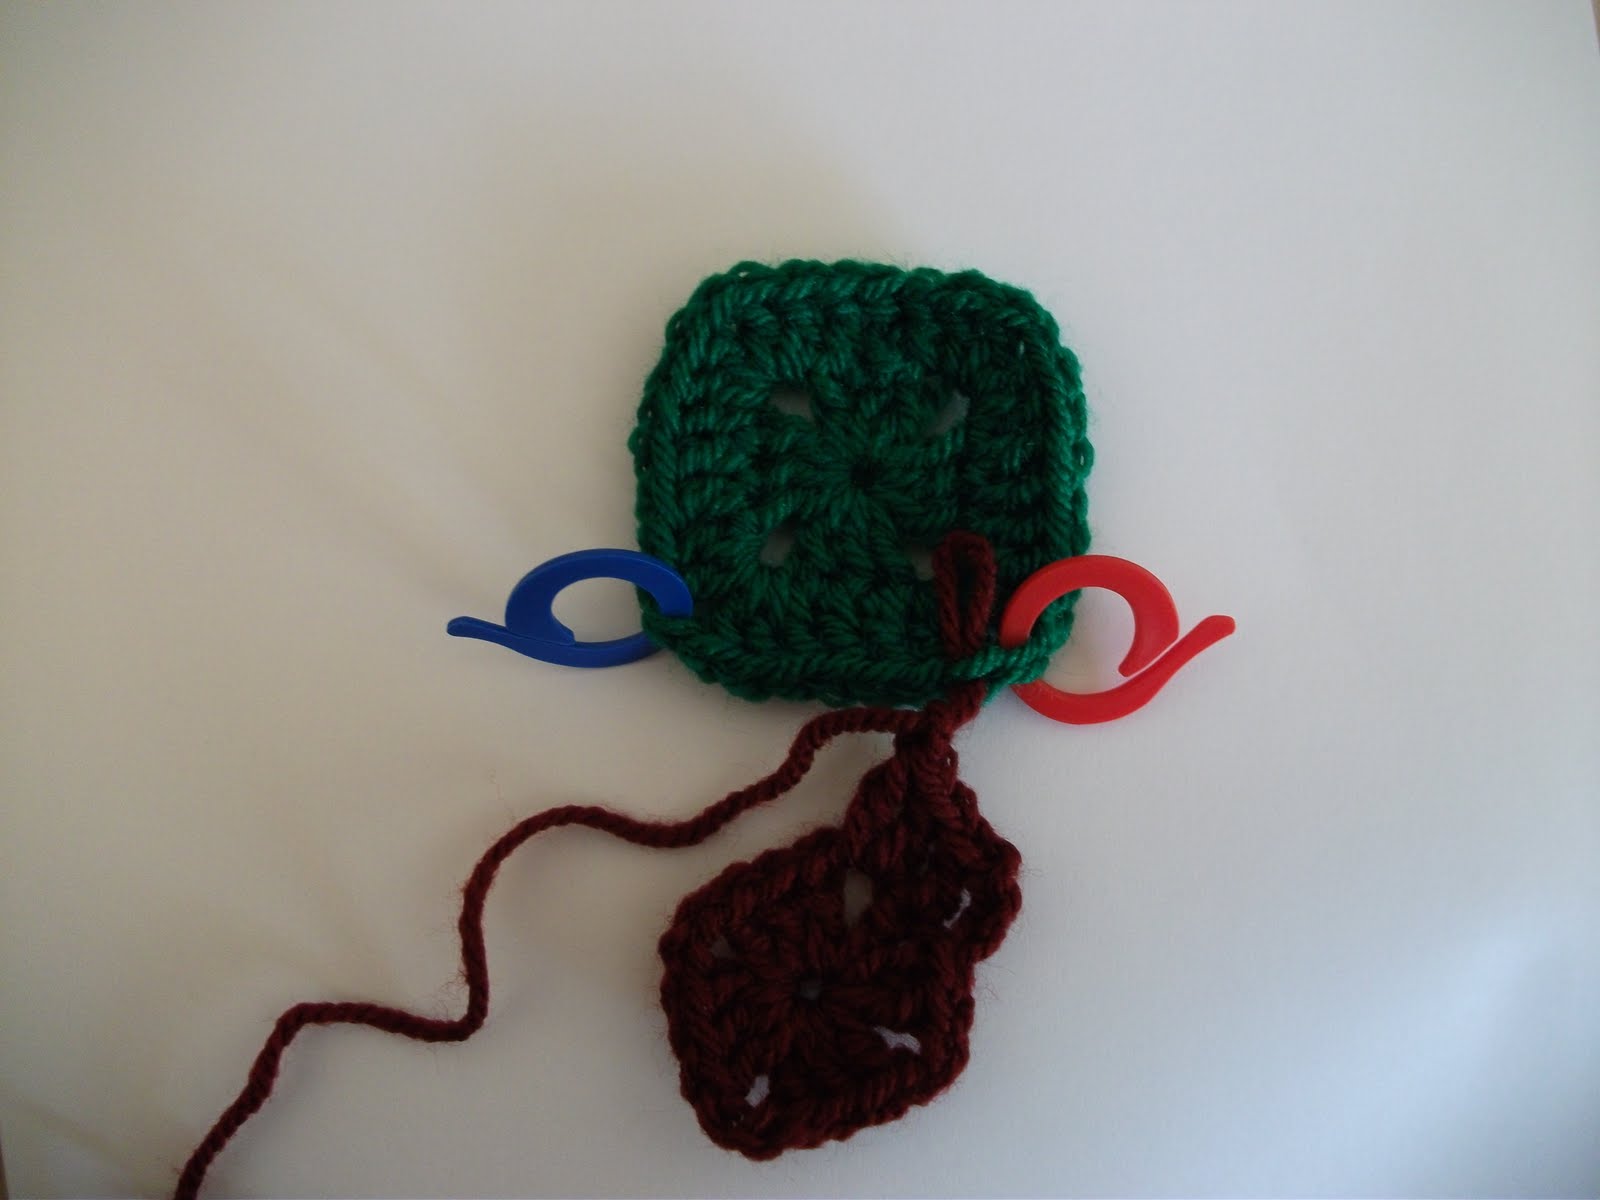
Here is where it gets interesting, on the first square there are 7 DC's along each side with a chain 1 in the corners. To show where we are starting to connect I have put 2 stitch markers in 2 adjacent corners in square number 1 (below). Also in the picture below is a sewing needle, pay close attention to where it's placed. It positioned under the uppermost loop of the DC to the left of the 1st stitch marker (in my case it's a red marker).

We will be joining from the red marker to the blue one. At the moment you have just made a chain 1 on the second square, length this loop (the working loop) so you dont loose it, and remove it from your hook. Now insert your hook in the same way the needle is in the above picture, from top side in a downwards direction through the topmost loop only of the stitch to the left of the red marker. Now pick up the working loop you dropped a moment ago and pull it all the way through the loop of the first square as shown below.
What we did just there, by pulling the working loop through a loop on the first square, from here on I'm going to call this "connecting the loop". This is the key to this method and I hope I have explained it ok. If not I will come back and take more pictures etc to try and help.
If you lengthed that loop now is the time to pull it back to normal size, you can now yarn over and make a DC in the corner space of the second square, just as you normally would. Before you go and make the required second DC in the corner space connect the loop on your hook to the next available loop on the first square (top loop only) in the same way as before. Once you have connected the working loop you can make the second DC in the corner space of square 2 shown below.

The above picture shows two stitches connected and the working loop is connected ready to make another DC. If you got this far you should be able to carry on to the end of this row, connecting each stitch as you go. You shoud find the there are 7 loops between the two stitch markers on square one and 7 DC's to be made on square 2, four of those DC are in corner spaces.
When you get to the next corner you are connecting the 2 DC's that form the first part of the corner to the first square, but before you carry on to finish the rest of the square you have to do somthing first. After you make the second DC into the corner space of square 2 (having connected the loop first) you need to connect the working loop to the one that the blue stitch marker is sitting on, the chain 1. So remove the marker, drop the working loop and pull it through the top loop of the chain in the corner of square 1. Now you can chain 1 and complete the rest of square 2 as normal, from here its 2dc in the corner space.......etc......as normal with no connecting loops as we were only connecting one side.
What you should have now is somthing that looks like the picture below, it looks like you whipstitched them together, neah eh?

Joining More Squares On
Right now you can go ahead and make a 3rd square and attach it to one side of the 2nd square to form a L shape. To join you simply do the same process as you just did, theres no difference, just pretend the other square isnt there. Dont forget after joining the top of each DC to attach the working loop through the chain 1 before finishing the rest of square number 3.
When you come to join square number 4 on, you start as you did before and join from the red marker towards the centre in the picture below.

The first part about joining the fourth square is the same as you did before, join each DC along to its opposite and the last working loop through the chain 1 in the square you are joining to. Before you carry on and join the last side remove the working loop from the hook and connect it to the top loop of the first DC along the next side you are joining to. Now you can complete this side, connecting the loops as you have been. when you get the end of this square you should have something like the picture below.

I did mean to take more pictures of this but forgot. If what i have written isnt enough to help you understand i will do another set with lots more pictures.
I realy really like this joining method, theres no ridge which you get when you join granny squares as you go. This means it lays flat, its also very neat and doesnt involve much extra effort once you get the hang of it. I like no having to sew the squares together and thus not having extra ends to weave in.
Iwould realy appreciate it if someone tried this out, I'm sure theres a better way of doing those corner joins.
Please let me know if i need to expand this or anything else for that matter.
Thanks
No comments:
Post a Comment