Showing posts with label JAYG. Show all posts

Friday, 18 February 2011

Babette Construction - Section Five

Colours and Order

8.2 - saffron and meadow
4.23 - shrimp and saffron
4.21 - saffron and meadow
4.24 - shrimp and saffron
4.22 - shrimp and saffron
8.3 - matador and shrimp


section 05


Its nice seeing the green come out more, I think there's blue coming in the next section.  Having laid this out om my bed I think the finished blanket is going to be bigger than I envisioned.  I also don't think its really going to look great until near the end due to the way the colours are distributed over the blanket.

Enjoy!

Babette Construction - Section Four

Colours and Order

6.9 - shrimp and saffron
4.36 - shrimp and saffron
2.37- saffron and meadow
2.38 - shrimp and saffron
6.10 - shrimp and saffron

So far so good, I am still enjoying myself.  The JAYG is still going well too, theres no confusion as to where to start or stop - not yet anyways.  I am enjoying it so much I'm planning what to do next, either another Babette in different colours or something that utilises the JAYG.


section four

Have Fun!

Saturday, 8 January 2011

Part Five – Joining Multiple Smaller Squares onto a Larger One

Right, the last part, as in part 4 of this series I am going to skim past some of the stitches to be joined.  The reason being that by now (this assumes you have read the other parts in the series first and not just started here) you don't need every picture, just the start and end of the joins.  If you haven't already go back to the start and work through all the other parts of the series, if you are only working with same size squares then you only need part one and not this one.


The next picture shows where we are starting, as usual the square to be added is worked until the first corner 2 DC chain 1.  In the picture below we will be joining the bluebell square on from point A to point B.  It may be helpful to place a marker on the centre DC of the purple square as this stitch lines up with the seam and not either of the squares.

Picture 1. Where we start.

Now to connect the first chain, as in earlier parts; lengthen the loop on your hook, remove hook, place hook through chain on purple square (both loops), pull the working loop through, snug the loop back to size, now chain 1, shown in Picture 2.

Picture 2. To the left loop connected, to the right chain made.

Now we can connect the first DC; lengthen the loop on your hook, remove hook, place hook through stitch on purple square (both loops), pull the working loop through, snug the loop back to size, DC in blue square, shown in Picture 3.

Picture 3.


Next the 7th DC; lengthen the loop on your hook, remove hook, place hook through stitch on purple square (both loops), pull the working loop through, snug the loop back to size, DC in blue square, shown in Picture 4.

Picture 4.
Now for the chains at point B (shown in picture 1).  Point B is the centre stitch on the purple square and as discussed in part 4 of this series, this stitch lines up with the seam between this square and the next one.  As we complete both this square and the yellow one (which is coming up next) a chain from each of the bluebell and yellow squares will be joined to the centre stitch - yes both of them. 

For right now carry on as normal connecting the first of the two chains to this centre stitch as follows; lengthen the loop on your hook, remove hook, place hook through centre stitch on purple square (both loops), pull the working loop through, snug the loop back to size, chain 2 in bluebell square, shown in Picture 5.

Picture 5.

That's the bluebell square joined on, you can carry on as normal to finish it, shown in picture 6. 

Picture 6.

Now on to the second square, which is joined from point A to point B then from point B to point C (picture 7).

Picture 7.

The first chain;  lengthen the loop on your hook, remove hook, place hook through chain on bluebell square (both loops), pull the working loop through, snug the loop back to size, now chain 1, shown in Picture 8.

Picture 8.

The first DC; lengthen the loop on your hook, remove hook, place hook through stitch on bluebell square (both loops), pull the working loop through, snug the loop back to size, DC in yellow square, shown in Picture 9.

Picture 9.

The last DC; lengthen the loop on your hook, remove hook, place hook through stitch on bluebell square (both loops), pull the working loop through, snug the loop back to size, DC in yellow square, shown in Picture 10.

Picture 10.
Tthe first corner chain; lengthen the loop on your hook, remove hook, place hook through chain on bluebell square (both loops), pull the working loop through, snug the loop back to size, now chain 1, shown in Picture 11.

Picture 11.

The second corner chain, this is the one I mentioned earlier, this needs to be connected to the same stitch as the corner chain of the bluebell square.  So look at the centre stitch on the purple square, you should be able to see that it already has something going through it, make sure this is the place you connect your chain to as you will run out of space otherwise.  So, lengthen the loop on your hook, remove hook, place hook through centre stitch on purple square (both loops), pull the working loop through, snug the loop back to size, now chain 1, shown in Picture 12.  At this point on the purple square you should have 7 DC available to connect to in order to complete the joining process.

Picture 12.


The first DC of the second side; lengthen the loop on your hook, remove hook, place hook through stitch on purple square (both loops), pull the working loop through, snug the loop back to size, DC in yellow square, shown in Picture 13.
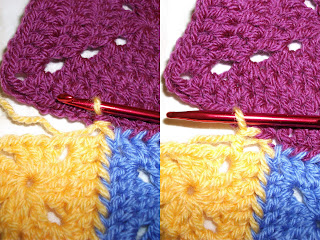
Picture 13.

The last DC; lengthen the loop on your hook, remove hook, place hook through last stitch on purple square (both loops), pull the working loop through, snug the loop back to size, DC in yellow square, shown in Picture 14.

Picture 14.

The corner chain;  lengthen the loop on your hook, remove hook, place hook through first chain on purple square (both loops), pull the working loop through, snug the loop back to size, chain 2 in yellow square, shown in Picture 15.

Picture 15.
Now you can complete the yellow square as normal, which should look like picture 16.

Picture 16.
I hope that all made sense, if not please leave a comment and I will try to fix it.

Back to Joining Index.

Have Fun!

Monday, 3 January 2011

Joining Squares Part Four - T Style Join


In this tutorial we will be joining the purple square onto the smaller ones as shown above.  A brief talk about the maths involved in this join.  The red and yellow squares both have 7 DC on there edges, but the purple one has 15.  For ages I couldn't figure this out until I realised that the seam between the red and yellow squares takes up the space of a DC on the purple square.  This just means that the central DC on the joining edge of the purple square is joined a little differently.

You should be familiar with the joining process  from the other tutorials in this series, here.  So lets begin as always, get to the first corner of the purple square, 2 DC, chain 1.

Picture 1. Start

Now lengthen the loop, remove your hook, insert the hook down through the left most chain of the red squares right hand corner in picture 1, pull the working loop through, snug the loop, make 1 chain.

Picture 2. To the left the loop connected, to the right 1 chain made.
Now we need to make a DC into the corner of the purple square, lengthen the working loop and remove the hook, insert hook through 1st DC on red square, pull the working loop through, snug loop back down, make DC into corner space of purple square.

Picture 3. To the left the loop connected, to the right the DC made.

The 2nd DC of the corner is made the same way, lengthen the working loop and remove the hook, insert hook through 2nd DC on red square, pull the working loop through, snug loop back down, make DC into corner space of purple square.

Picture 4. To the left the loop connected, to the right the DC made.
Now join and connect the next five DC's of the purple square so that you have made 7 DC's in total, this is the same as we have done in previous joins, the next stitch is the 8th DC in total.  When you have made the five DC's stop.  The 8th stitch is the extra stitch I mentioned earlier which in theory connects to the seam between the red and yellow squares.  So when you connect the loop for this stitch you connect it to the unused chains in the corners of the red and yellow squares.

So lengthen the loop and remove your hook, insert your hook down through the unused corner chain of the red square and pull the working loop through, now insert your hook through the unused corner chain of the yellow square and pull the loop through.  Now you can snug the working loop down to close the gap and make the 8th DC of the purple square.

Picture 5. To the left the loop connected, to the right the DC made.

From here you can complete the join as in earlier tutorials, there are 7 DC in total left to make.  The next 3 pictures show the corner stitches made.

For the first of the corner DC, lengthen the working loop and remove the hook, insert hook through DC on yellow square, pull the working loop through, snug loop back down, make DC into corner space of purple square.

Picture 6. To the left the loop connected, to the right the DC made.

 For the second of the corner DC, lengthen the working loop and remove the hook, insert hook through DC on yellow square, pull the working loop through, snug loop back down, make DC into corner space of purple square.
 
Picture 7. To the left the loop connected, to the right the DC made.

The last thing to do with the join is the corner chains, lengthen the working loop and remove the hook, insert hook through first corner chain on yellow square, pull the working loop through, snug loop back down, make 2 chains.

Picture 8. To the left the loop connected, to the right 2 chain made.

Now continue to make the purple square as normal.

Picture 9. The right side, the wrong side.
 Back to Join Index

Sunday, 2 January 2011

Joining Squares Part Three - Join on Two Sides

If you have been following the various parts to this guide you should now be in a  position to set in a square, that is make a join on two sides.  In reality this isn't any more difficult than the other joins.

In past parts to this joining method I have included pictures for each stitch, for this one I will be using less pictures.  So from here on I will be showing the picture for the first chain, first 2 DC (the stitches that form the first corner) and the 2dc and 1 chain at the end.  In the case of this tutorial there will be 2 sets of pictures, one for each side that is joined.


So lets get started, picture one shows us set up for the next join, as always the first corner of the red square  begins with 2 DC chain 1.  We will be joining from point A to point B then from point B to point C.  The pictures are laid out with the right sides uppermost, if I was holding the pieces to be joined they would be wrong sides together.

Picture 1. Start

As with earlier joins we begin with the chain at point A (its the left chain as the picture is orientated), lengthen the working loop, remove your crochet hook, insert your hook down through the chain on the green square, pickup the working loop, snug the loop back down, chain 1.

Picture 2. Showing the chain being joined.
Now we need to make the first DC, lengthen the working loop, remove your crochet hook, insert your hook down through the next stitch on the green square, pickup the working loop, snug the loop back down, make a DC into the corner space of the green square.

Picture 3. Showing the first DC joined.

Next the 2nd DC, lengthen the working loop, remove your crochet hook, insert your hook down through the next stitch on the green square, pickup the working loop, snug the loop back down, make a DC into the corner space of the green square.

Picture 4.  Second DC joined.
Right, the next 3 DC on the red square are made into the 3 DC of the previous round.  As we have covered this the the first two parts of this series I'm not going to include the pictures this time.  So go ahead and join the next 3 DC, lengthen the working loop, remove your crochet hook, insert your hook down through the next stitch on the green square, pickup the working loop, snug the loop back down, make a DC into the red square - 3 times.

Now we are onto the 2nd corner which joins at point B on picture 1.  As before lengthen the working loop, remove your crochet hook, insert your hook down through the next stitch on the green square, pickup the working loop, snug the loop back down, make a DC into the corner space of the red square. Picture 5 shows the 6th DC, picture 6 shows the 7th and last DC for this side.

Picture 5.  6th Stitch connected and made.
Picture 6.  The last DC on first side joined and made.
Now we are on to the corner in the middle, first we need to join the first chain of this corner on the red square to the green square.  Picture 7 shows the hook placement for this, it should be the only thing left for you to join to on the green square. Picture 8 shows the chain being joined and made, lengthen the working loop, remove your crochet hook, insert your hook down through the chain on the green square, pickup the working loop, snug the loop back down, make one chain.

Picture 7. Hook placement
Picture 9. Corner chain 1 made.
Now for the second chain,, you need to connect your working loop through the chain on the yellow square  (picture 10) at point B (as shown in picture 1).

Picture 10. Hook placement for second chain.
Once you have the hook where is needs to be continue as previously, pick the working loop back up and pull through, snug the loop back down and then chain one shown in picture 11.

Picture 11. chain made on second side.
The join continues as previously, we now start with the first DC on the second side of the red square.  As earlier I'm only including the first 2 and last 2 DC pictures on here.  Picture 12 shows the first DC, picture 12 shows the 2nd DC. 

Picture 12. First DC joined and made.

Picture 13. 2nd DC joined and made.
Now I'm going to jump to the end of the join, you should be able to join the next 3 DC without any hassle.  Picture 14 shows the first of the corner DC joined and made, lengthen the working loop, remove your crochet hook, insert your hook down through the next stitch on the green square, pickup the working loop, snug the loop back down, make a DC into the corner space of the red square.  Do this twice, picture 14 shows the first of the 2 DC made and picture 15 shows the second.

Picture 14. Corner DC made.
Picture 15.  Second corner DC made.
The last thing we need to do is the chain, as with earlier joins, lengthen the working loop, remove your crochet hook, insert your hook down through the chain on the green square, pickup the working loop, snug the loop back down, chain 2. 

Picture 16. Chain made.

You can now continue making the red square as usual.


Picture 17.  Finished Joins
Back to Join Index

Saturday, 1 January 2011

Joining Squares Part Two - Joining a Square to Start a New Row


This tutorial follows on from the first one here to join a third green square on.  If this was a blanket the green square would be the start of a new row and you would of used part one multiple times to make one long row of squares.  I haven't explained in as much detail how the join works so I would highly recommend making sure you have read and tried the tutorial at Part 1.

Picture 1. Where we are joining.

We are going to be joining a green square on, from point A to point B in Picture 1.  If you are following on from the first tutorial you should have two squares joined as in this picture.  At point B on each of the squares there will be one un-joined chain (next to the DC on the un-joined side), these chains are used when joining a square onto the adjacent sides.  For this join we will be using the un-joined chain in the bluebell square and only one chain from point A exactly as in part one.

So to start, as usual, get your next square to its last round and part way through the first corner - 2DC, ch1 (shown in the next picture).

Picture 2.  Ready to Start.

So as in the earlier tutorial, lengthen the loop on your hook so you don't drop it, put the hook down through the first chain, pick the working loop back up and pull it through the chain, snug the loop back down, then chain 1 (shown in picture 3 below). When I say" the first chain" I mean at point A on picture 1, the leftmost chain looking at the picture.  This was discussed in more detail in part 1.

Picture from Part 1 showing stitches involved in the join
Picture 3. To the left the loop connected, to the right the chain made.
Now we need to move on to the first DC of the corner, so lengthen the loop, place crochet hook down through 1st DC on Bluebell square, pull the working loop through, snug the loop back down, make DC into corner space of green square (picture 4).

Picture 4. To the left the loop connected, to the right the DC made.

The second DC is made in the same way, lengthen the loop, place crochet hook down through 2nd DC on Bluebell square, pull the working loop through, snug the loop back down, make DC into corner space of green square.  That should leave the corner on the green square finished (picture 5).

Picture 5.  To the left the loop connected, to the right the DC made.

The next three DC made on the green square are made into a DC from the previous round, as earlier, lengthen the loop, place crochet hook down through next DC on Bluebell square, pull the working loop through, snug the loop back down, make DC into DC of green square.  Repeat this 3 times along the bluebell square working towards point B on Picture 1, this is shown in pictures 6, 7 and 8 below.

Picture 6. To the left the loop connected, to the right the DC made.
Picture 7. To the left the loop connected, to the right the DC made.
Picture 8.  To the left the loop connected, to the right the DC made.
We are now ready to make the second corner of the green square, lengthen the loop, place crochet hook down through next DC on Bluebell square, pull the working loop through, snug the loop back down, make DC into corner space of green square (picture 9)

Picture 9.  To the left the loop connected, to the right the DC made.
Now for the second corner stitch of the green square, lengthen the loop, place crochet hook down through next DC on Bluebell square, pull the working loop through, snug the loop back down, make DC into corner space of green square (picture 10)

Picture 10.  To the left the loop connected, to the right the DC made.
The last part of the join is the corner chain, picture 11 shows the placement of the hook for this, you should find is it the last available thing for you to join to next to the bluebell square.  As with earlier joins, lengthen the loop, place crochet hook down through chain on Bluebell square, pull the working loop through, snug the loop back down, now chain 2 (one counts as the joined chain the second is an un-joined chain)

Picture 11.  Showing hook placement for corner chain.
Picture 12.  To the left showing loop connected, to the right 2 chain made.
 That's the end of the join, from here on complete the green square as normal.

Picture 13. To the left the right side, the the right the wrong side.
The next part of the tutorials will show how to set in a square to fill the gap between the yellow and green squares.

Back to Joining Index