Friday, 17 September 2010

Join As You Go Squares - Part 2

I managed to join 4 granny squares together this morning but had to go do some chores.  So after I came back and tried to recreate what I did, here it is.

make a two row granny square as pictured below :)  i have chain 2 in my corners.


We now start a second granny and work round 2 until we get to the first corner, work 3DC and a chain 1 into that corner then stop.  We are now going to start connecting it to the first granny


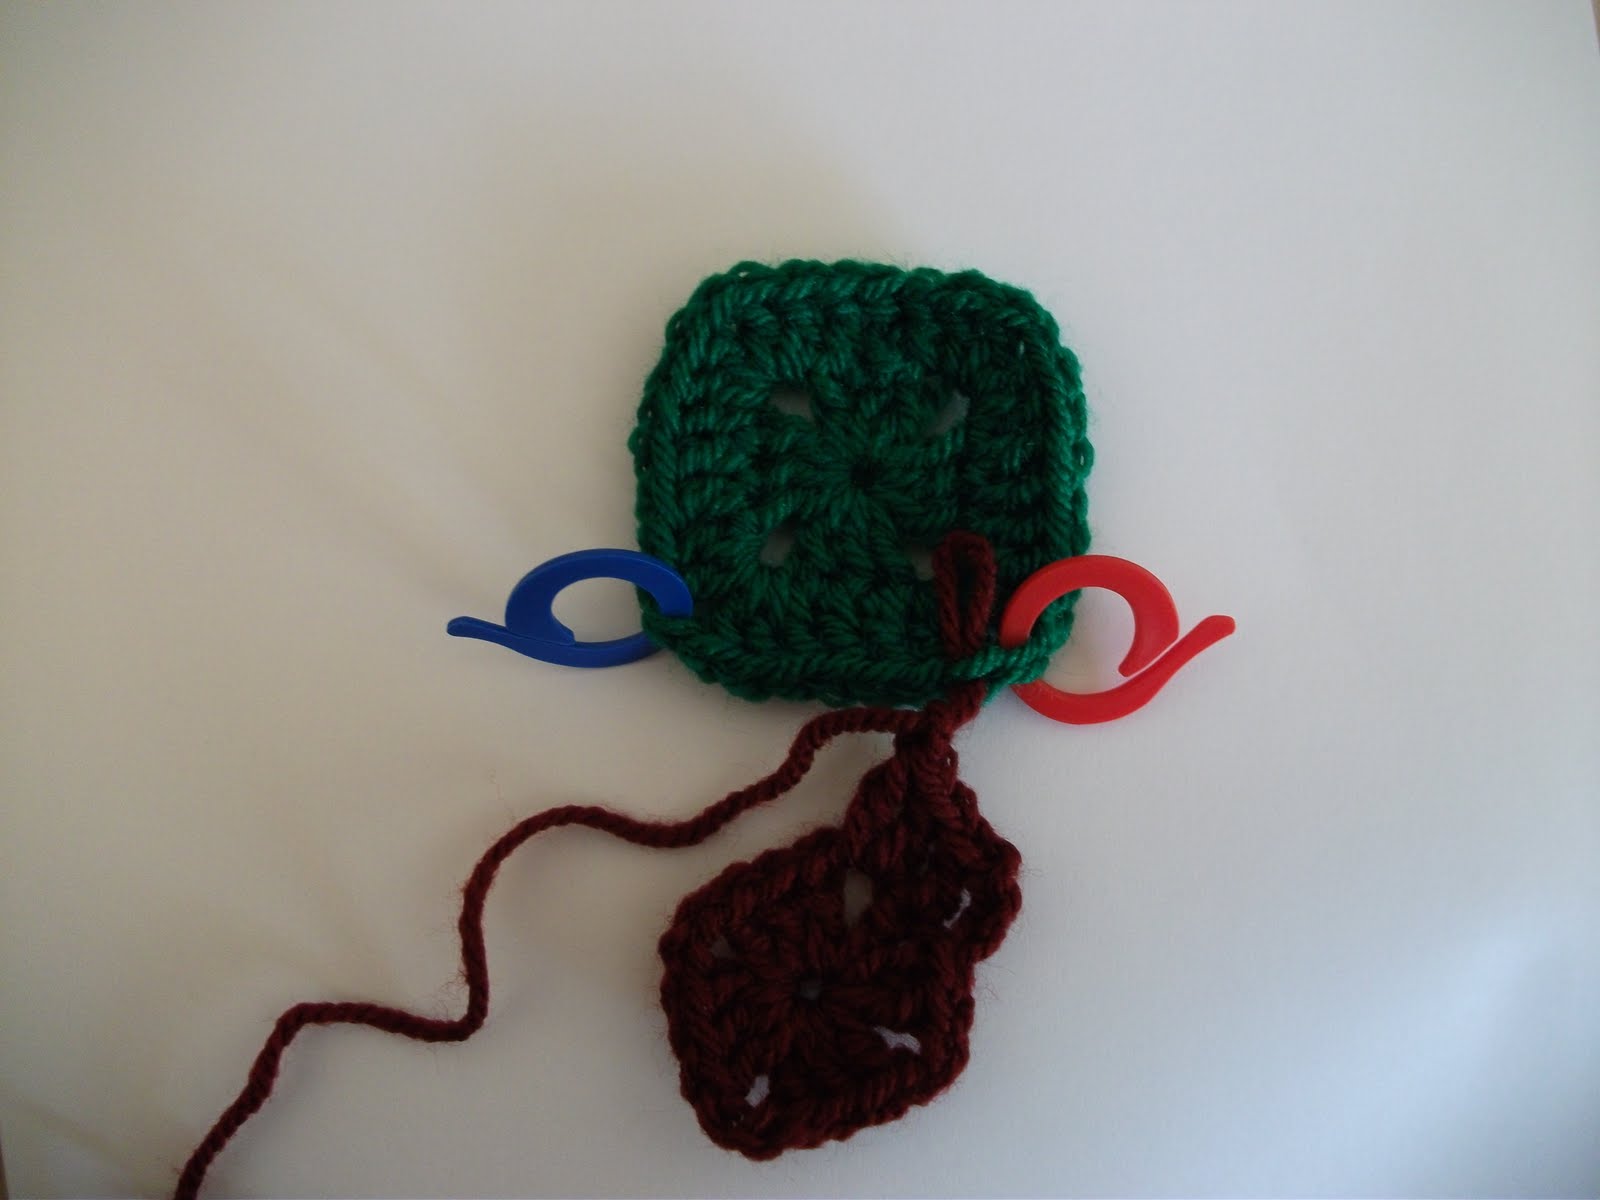
This next picture shows where we need to start connecting, length the loop on your hook so it doesn't get lost, then remove your hook from this working loop.  Insert you hook through the top-most loop of the chain closest to the 1st DC on the side we are going to be joining as in the picture below.  In this picture we are joining from the red stitch marker to the blue one. 


when you have the hook there, pick the working loop back up and pull it all the way through the chain loop on the first square.  I call this connecting the loop, its how you join every stitch to its opposite.


Now you chain one and again lengthen the loop on your hook and remove it.  Insert your hook, as before through the top loop of the first DC on the side we are connecting and pickup the working loop and pull it through, ie connect the loop as before.  Now you can yarn over and make a DC into the corner space of square number 2 as you normally would.  The picture below shows where we are so far.


You should be OK now to connect the loop to the top of the next DC and then make a second DC into the corner space.  Then again for the third DC in the corner of square 2, remembering to connect the loop before starting each stitch.  This next picture shows 3 DC connected and the loop is connected ready to make a chain 1.


when you get to a chain space, connect the loop as before to the top loop of the chain on the 1st square then chain one, then connect the loop to the top of the next DC before carrying on.   Every DC and every chain is connected to its mirror on the first square.


Now we get to the corner, connect the 3DC that form the first part of the second corner as you have been doing.  Now connect the loop after making the 3rd DC through the loop of the first chain in the corner of square one then chain one.  Don't chain any more than one, seriously :).  Now you can continue to finish the second square as normal as that was the only side we were connecting.  you should have something that looks like the squares below, as if you whip stitched them together.


So to try and summarise, connecting on one side, after 3dc chain 1 on square 2:

  • drop the loop and connect it the the chain next to the 1st dc, then chain 1
  • connect this loop to the 1st dc on the 1st square, then dc in corner or sq2
  • connect loop to 2nd DC in 1st square and make a 2nd dc in the corner of squ2
  • connect loop to 3rd DC in 1st square and make a 3rd dc in the corner of squ2
  • connect loop to chain and chain 1
  • connect loop to 1st dc in next cluster on square 1 and make a dc in appropriate place on sq 2
  • connect loop to 2nd dc in next cluster on square 1 and make a dc in appropriate place on sq 2
  • connect loop to 3rd dc in next cluster on square 1 and make a dc in appropriate place on sq 2
  • connect to chain on square 1 and chain 1
  •  carry on as normal to complete the square
I am going to jump ahead and join a 3rd square on as it just the same as we just did. Begin the 4th square as you did the last two, get to the first corner on round 2 and begin connecting it as you have been along the side from the red marker to the centre.


When you get to the centre you should connect the first 3 DC's that form the corner of square 4 as you have been already, then again connect the loop to the chain on the square you have been connecting to and chain 1 (same as you did before).  now on the next square you are connecting to there should be a chain available just prior to the first Dc you will be connecting to.  I want you to connect to that chain and chain 1, then you should be able to carry on connecting this second side as you have been doing and finish off to complete the last square. 


The above pic shows where i was after i connected the chain on the first side and i have pulled the working loop through the chain on the second side.

The last picture shows a completed join of four squares, i love how neat this looks :) it lays nice and flat.

Thursday, 16 September 2010

Join As You Go Squares Part 1

I've been pondering how to make a large throw with lots of squares in it, each would be made in the round and only be two rounds big.  This has headaches due to the seaming of the squares and ends to weave in.  When posting on Crochetville someone said that Join As You Go (JAYG) methods didn't just have to be connected at the corners and chain spaces.  I went away and tried something, it seems to work so here it is.

This doesn't have to be two round squares, they can be any size you want them to be.  I reckon you could use this in other places too I just haven't thought about it yet.  As I'm moving shortly I wont be able to post more than one way at the moment.

US Terminology
Hook used - 4mm
Yarn Used - scrap dk acrylic

Round 1
I start with a magic ring, but you don't have to, so into the ring, chain 3, dc, (chain 2, 3dc) 3 times, chain 2, 1 dc into the ring, ss to top of chain 3 to end the round.  Thats the start of your average granny square.

Round 2

chain3, dc in next dc, * (2dc, chain1, 2dc) in corner space, dc in each of next 3 dc * repeat from * to * 3 times, then (2dc, chain1, 2dc) in corner space, dc in next dc, Slipstitch in top of chain 3 to close the round.  fasten off and weave in your ends.


Second Square - Joining on One Side

Now, start a second square by completing round one as before, then begin round 2 with chain 3, dc in next dc, 2dc chain 1 in corner space.

Here is where it gets interesting, on the first square there are 7 DC's along each side with a chain 1 in the corners.  To show where we are starting to connect I have put 2 stitch markers in 2 adjacent corners in square number 1 (below).  Also in the picture below is a sewing needle, pay close attention to where it's placed.  It positioned under the uppermost loop of the DC to the left of the 1st stitch marker (in my case it's a red marker).


We will be joining from the red marker to the blue one.  At the moment you have just made a chain 1 on the second square, length this loop (the working loop) so you dont loose it, and remove it from your hook.  Now insert your hook in the same way the needle is in the above picture, from top side in a downwards direction through the topmost loop only of the stitch to the left of the red marker.  Now pick up the working loop you dropped a moment ago and pull it all the way through the loop of the first square as shown below.


What we did just there, by pulling the working loop through a loop on the first square, from here on I'm going to call this "connecting the loop".  This is the key to this method and I hope I have explained it ok.  If not I will come back and take more pictures etc to try and help.

If you lengthed that loop now is the time to pull it back to normal size, you can now yarn over and make a DC in the corner space of the second square, just as you normally would.  Before you go and make the required second DC in the corner space connect the loop on your hook to the next available loop on the first square (top loop only) in the same way as before.  Once you have connected the working loop you can make the second DC in the corner space of square 2 shown below.


The above picture shows two stitches connected and the working loop is connected ready to make another DC.  If you got this far you should be able to carry on to the end of this row, connecting each stitch as you go.  You shoud find the there are 7 loops between the two stitch markers on square one and 7 DC's to be made on square 2, four of those DC are in corner spaces.

When you get to the next corner you are connecting the 2 DC's that form the first part of the corner to the first square, but before you carry on to finish the rest of the square you have to do somthing first.  After you make the second DC into the corner space of square 2 (having connected the loop first) you need to connect the working loop to the one that the blue stitch marker is sitting on, the chain 1.  So remove the marker, drop the working loop and pull it through the top loop of the chain in the corner of square 1.  Now you can chain 1 and complete the rest of square 2 as normal, from here its 2dc in the corner space.......etc......as normal with no connecting loops as we were only connecting one side.

What you should have now is somthing that looks like the picture below, it looks like you whipstitched them together, neah eh?


Joining More Squares On

Right now you can go ahead and make a 3rd square and attach it to one side of the 2nd square to form a L shape.  To join you simply do the same process as you just did, theres no difference, just pretend the other square isnt there.  Dont forget after joining the top of each DC to attach the working loop through the chain 1  before finishing the rest of square number 3.

When you come to join square number 4 on, you start as you did before and join from the red marker towards the centre in the picture below.


The first part about joining the fourth square is the same as you did before, join each DC along to its opposite and the last working loop through the chain 1 in the square you are joining to.  Before you carry on and join the last side remove the working loop from the hook and connect it to the top loop of the first DC along the next side you are joining to.  Now you can complete this side, connecting the loops as you have been.  when you get the end of this square  you should have something like the picture below.


I did mean to take more pictures of this but forgot.  If what i have written isnt enough to help you understand i will do another set with lots more pictures.

I realy really like this joining method, theres no ridge which you get when you join granny squares as you go.  This means it lays flat, its also very neat and doesnt involve much extra effort once you get the hang of it.  I like no having to sew the squares together and thus not having extra ends to weave in.

Iwould realy appreciate it if someone tried this out, I'm sure theres a better way of doing those corner joins.

Please let me know if i need to expand this or anything else for that matter.

Thanks

Thursday, 2 September 2010

Granny Stripe

My Father in Law is ill and has been diagnosed with a couple of things so I decided to make him a blanket.


So I'm using Stylecraft DK, colours listed below:

Top Row - Walnut - Copper - Graphite - Khaki - Green
Bottom Row - Meadow - Camel - Denim - Mocha

I began with a row of foundation single crochet and the Granny Stripe pattern from Attic 24, after some adjustments it ended up being 40 inches wide.  When I got through all my colours I decided that the green just didn't fit, so I am missing it out.


I am loving my colours and the lovely pattern by Lucy :)

Have Fun

Monday, 26 July 2010

My First Finish

I suddenly realised that I hadn't Posted a picture of the throw I finished a couple weeks back..... D'oh!  This was standard granny squares joined with a join as you go method that I got from Attic 24.  I added a border and left it at that, no edgings or anything, just simple.


This is intended for my daughter, who is 2 at the moment, but I reckon it would just get ripped just now so it is getting saved until next Christmas so she can appreciate it more.

I did find that adding the first row of granny border made it ripple and with some help from friends in the Ravelry group "We Love Lucy" I fixed it using this.  The only problem was  that I was halfway through an 8 row border....oh well.  I can see a few patchwork designs looking good in crochet though which means my patchwork books will come in handy for some inspiration.


Have Fun!

Sunday, 25 July 2010

More Babette Ponderings

Right since I first starting thinking about this I've changed my mind a bit.  To be fair that's normal for me its to be expected.

First off I am not using Bonus DK as the colour range isn't wide enough for the Warm/ Cold colours I wanted to do.  Someone pointed out to me on the "We Love Lucy" group on Ravelry that the Babette cushion I said I like was being made with Biggan Merino 8ply (DK weight).  So off I went and immediately started drooling, bought a shade card and I am still drooling.  It does cost more per ball, well d'oh its merino its supposed to, but the shades it comes in make it worth it and then some.  I can't get enough of the shades this comes in  :)

So now I have got my yarn sorted I decided to plan out a rectangle Babette by making an extension.  I was happy too that I have managed to draw this in Electric Quilt 7.  This means once I get the colours picked I can colour it in on screen and plan out what I'm doing well in advance.  For now though i need to save up for my yummy yarn :)

Other than all this I have been up to a lot and think I need to do a few postings to show what I've been up to.  Finishes, new starts and ideas :)

See you soon :)

Thursday, 15 July 2010

Babette Ponderings

I think I first saw the Babette on Ravelry sometime and liked it.  To be fair I wasn't keen on the colours but I loved the design and to me it seemed mad! Just like me :).

So I bought the pattern, at the time I was working on my daughters throw which was granny squares using a Join as You Go method.  So I went back to Ravelry and looked at the pictures and saw that there were indeed some made from granny squares and not solid squares.

At this point I stopped, I'm skint at the moment so didn't think any further than that.  That is until I got the border on my daughters throw.  I suddenly thought "Could the Babette be done Join as You GO?"  I couldn't think of a reason why not, there would be a few kinks to figure out.  So again off I went to the Internet and found that someone has already done this, yey!  So now I knew it would work.

The thing is making a Babette needs planning especially if you are not using the yarn in the pattern as you need to figure out what colours you are using and then do your own lists etc so you know what you are doing.  You could wing it though :)  I will be using Bonus DK by Hayfield for two reasons, it’s cheap and its acrylic as well as the fact I have been using it and like it :)

The thing now is I need to plan as "Failing to Plan is Planning to Fail" no idea where that came from but it popped in my head.  I'm going to start by trying to draw the layout into Electric Quilt, which I already own.  Once I have that sorted I can colour it in to my hearts content.  Then I can make lists of colours etc.

I've been on Ravelry in the meantime looking at the photos there of other peoples Babettes’ trying to decide what I like and don't like about them.  I love the ones using just one colour scheme; there were just pinks and just green Barbettes’.  I also liked the ones where the colours were planned, I definitely wasn't too keen on the stash busting ones as the colours were too mad for me but they still looked cool.

Whilst on the way to the shops this morning in the rain I got thinking again.  What if I used a standard rainbow, I could have "warm" squares and "cold" squares.  I could also have some crossover squares, that way the throw would flow from warm to cold etc.  I like this idea but it would need a lot of planning, but I will be doing that regardless so I don't mind.  It suddenly occurred to me that some colours crossover anyways, you can have red yellow and orange in a warm square, blue yellow and green in a cold square.  I think my next step has to be to look at what yarn I would buy and go from there.  Although my first step is to draw it in EQ so I can colour it in on the PC.

My other major decision needs to be if I'm going to leave it square or make it bigger.  For now though it’s off to draw out the skeleton :)

See You Soon!

Sunday, 4 July 2010

Random Waves Tutorial

OK, my first tutorial.....I'm going to apologise first as I am new to this but also as I don't have a decent camera....just my mobile phone.

Right, I first saw a concept in a library book "The Crochet Workbook by Sylvia Cosh & James Walters", just to be clear its not my concept and I'm not taking credit for it.  If you like this it's worth trying to find a copy of the book as there was a lot of great stuff in it about freeform, it is however out of print.

Firstly a picture of the piece that I am making to sample the technique, it going to be a cushion cover when finished so it isn't very large as yet.

This design has a 2 row sequence which means all your tails will be at the same side, at first i would just leave them there while you get the hang of how this works then when you are happy you can work over the tails as you work you rows.....there's lot of tails :(

Pattern
US terminology used
Yarn/ hook - whichever yarns and hook you wish to use, i used DK weight with a 4mm hook

Chain as many as you want for what you are doing

Foundation Row (this is optional but i wanted a straight row to start the work from)
DC in 4th chain from hook, DC in each chain to end, and turn the work.  It can be easy when working this technique to add stitches to the work as you can get confused when to count the turning chain as a stitch or not....so from here on in be careful :)


Row 1
Using the same colour that you used on the previous row, it should start with a straight edge but as this is random sequences it work be mm perfect straight....but ish....you know :)


Using Single crochet (SC), Double Crochet (DC) and Trebles (Tr) work along the row in a random way but don't jump from a Single Crochet to a Treble.  Always make sure that there is a Double Crochet between Single Crochets and Treble Crochets....that is how the waves form by flowing through the stitches. You can work each stitch anything from once to seven or more times....be unpredictable and try not to look at previous rows too much.  When you get to the end of the row, change colours, cut the yarn and turn the work.

The turning chain is random, the same as the rest of the row but making sure you keep to forming waves........ I personally am making the stitch next to the turning chains the same as the turning chain to help me remember what the turning chain represents.


Turning chains
Single Crochet = 1
Double Crochet = 3
Treble Crochet = 4

This next pic shows the end of row one, its all wobbly :) but its shows the waves flowing, theres always a DC between Sc and Tr to keep the sahpe of waves.  Sometimes its only 1 stitch, sometimes its 4 or 5, sometimes i go from SC to DC and back to SC before going to another DC then a Tr


Row 2

This is where you need to pay attention, the stitches you work are directly related to the ones below.  To begin with look at the last stitch you made......and using the rules below decide what stitch you need to make into it.....

Rules
If the stitch below is an SC......work a Tr
If the stitch below is a DC......work a DC
If the stitch below is a Tr......work a SC

The turning chain follows the rules as well, be wary of counting the turning chain as a stitch or not as you may end up increasing at the ends of rows.

Turning Chain Rules

If the stitch below is an SC......work 4 chain - does count as a stitch
If the stitch below is a DC......work 3 chain - does count as a stitch
If the stitch below is a Tr......work 1 chain - does NOT count as a stitch


Work across the row following the rules set out above, it can be tricky to start with but you get used to it quickly, i find i can flow across the rows at normal speed now but i was slow to start with. 


here's a pic of the completed row 2. 


Rows 3 onwards

Repeat rows 1 and 2 in sequence changing colours every 2 rows to form the stripes.  whenever you come back to row 1, do not copy previous versions, each repeat of row 1 is a new random selection

closeup pic of my sample piece


if you look back to the first pic you can see how this develops with a few rows on.  I hope i haven't confused anyone as this is my first time writing a tutorial and i hope it makes sense :)