Friday, 17 December 2010

Babette Construction - Introduction

I'm going to be making a Babette Blanket but using a Join As You Go method I've written about previously.  Theres a Crochet A-Long (CAL) on Ravelry that I'm joining in with and some people there expressed interest in what I'm trying to do.  As a result I'm going to keep a record here of what I'm doing and try to explain how I'm doing it so that others can do the same if they wish.


The disadvantage of the Babette that puts most people off is usually the many ends to weave in as well as having to seam all those squares together.  While the number of ends can depend on how often you change colours, my method of joining does not add to this number and doesn't use much extra yarn (to me its seems I'm using no extra yarn).

So lets get on with the yarn I'm using, which is Stylecraft Special DK.  This is an acrylic yarn, double knit weight which is cheap and very soft (unlike some acrylics I've seen).  Having some some swatches recently I found I needed to use a 5mm hook for this (I just hope my gauge doesn't change).

Something I realised from reading the forums on Ravelry was that some people found that their smallest squares were too large in proportion to the others and meant the squares did not fit together as they were supposed to. There are a couple of fixes for this, you could make the smaller squares with Half Double Crochets(HDC's) instead of Double Crochets (DC's) or use a smaller hook for those small squares only.  Just to clarify I'm talking about the two round squares only, you shouldn't need to adjust any other size square.

When I first swatched for a Babette I seamed my squares together and found that the smallest squares were too big and needed adjustment.  It was trying to fix this that stopped me from starting my project and in the end I gave up.  It was while swatching with the joining method I'm now using  that I noticed my joining method seemed to improve the fit to the point that I didn't need to make any adjustments to the smaller squares at all.  I'm assuming that the fit problem was due to the seams adding extra width which in something this large would cause problems.

So for now here's a picture of my yarn and another picture showing my layout coloured in with an extra section I designed myself (I wanted a rectangle not a square).


Have Fun!

Julie

Thursday, 16 December 2010

Christmas Prezzies and Circular Knitting

Right, my in-laws sent us money so that we could buy our own stuff for Christmas this year so I bought some Knitpro stuff.

In an earlier post I wrote about my new Knitpro Interchangeable knitting needles and how i didn't like the acrylic, well I changed my mind.  I have a tendency to do this, its normal and quite often end up back where I started.  So having decided earlier that I didn't mind the acrylic needles after all I went ahead with my money and bought the deluxe set from Knitpro, the multicoloured set that is!


Along with this I bought some spare cables, cable connectors and one set of 4 mm 6 inch Double Pointed Needles (DPN's).  The thing is I've been toying with knitting in the round for a while now, there are 3 ways to do this so I decided to try out all 3 before committing myself to buying lots of extra needles etc.  There's magic loop, 2 circular needles and DPN's, my starter set that I already have allowed me to try out the first 2.  I found magic Loop do-able but didn't like it, can't put my finger on it though.  Using 2 circulars at once to knit a tube worked but I found stopping at the end of each needle to move the stitches onto and off the cables slowed me down.  I also found that when it came to putting the stitches back onto the needle from the cable that the last 2 stitches were quite tight and made it harder to do so.  I reckon this was a result of me tightening stitches to avoid ladders but couldn't figure out how to stop it happening.

So today I got my first set of DPN's and cast on to try a sample, the first few rounds were a bit fiddly but after a couple of complete rounds it was ok and I way flying, I love these.  Don't get me wrong, I could use 2 circulars to knit in the round but I really really love DPN's.

So my next step now that I've figured out how which method I prefer is to buy a set of DPN's, Knitpro do a set in metal and wood

Monday, 13 December 2010

Update on Babette

Right, if I recall correctly my last thoughts on this was to use Biggan Merino to get the colours I wanted.  This has changed considerably, mostly due to the price of the yarn, at £5 a ball it was going to cost a lot of money. 

Also I had been swatching up to test my gauge for this project and ran into some troubles.  It seems that the smallest squares in the pattern can often be too big to fit correctly in some areas.  It was this size issue that made me swatch, and I'm glad I did as mine were too big as well.  I tried a few different ways to re size my little squares but ended up unhappy about it and the cost of yarn and so decided to leave the Babette.

Since I gave up on it I found a palette of 8 colours in Stylecraft DK which I really loved, further to this a friend on Ravelry managed to convince me to join in the CAL she was starting in the new year.  A "Crochet A Long" or CAL is a few people working on the same design and helping each other with encouragement and pictures, in this case they are working on the Babette.

So having decided to change the yarn I would be using I went back to my colour chart and have spent a few days colouring and re-colouring and finally ended up with something I like.  It took me so long because my first recolours I got confused and used 6 colours instead of the 8 that I was supposed to.  So I fixed that and coloured in the chart with solid blocks of those 8 colours.

Although this looks like each square will be one colour, they wont be as I have a plan.  If I get the time I will add another picture showing this.

Wednesday, 3 November 2010

New Knitting Needles

Well kind of, they are interchangeable circular knitting needles but you get the idea.  I started to learn to knit a few months ago mainly because I kept seeing things I wanted to make but couldn't because they were knit.  The thing is I used to be able to knit as a kid but never carried it on and for the life of me couldn't remember anything.

So off I went and in my usual style was in search of a book to teach me, although to be fair my mum knits, but she is left handed and I'm not.  After some digging I was told that buying a book was pointless as there were many on-line resources to learn from and I was directed to knitinghelp.com.

So that's where it began, after some more research I decided to try to learn continental style knitting as it fit in with my existing crochet skills.  So far everything is going fine, I did have some problems with the purl stitch but that's another post :) 

So having discovered I can knit I figured I could go ahead and buy some more needles in different sizes and went off to do some more research.  I found out that a lot of people use only circular needles,  this has a few advantages.  You can use circulars for flat projects as well as in the round, small diameter when using the magic loop method and you don't poke people sitting next to you when knitting.  There's bound to be more but that's all I can think of right now. 

More googling followed and i decided on Knitpro, mainly because they were interchangeable but partly because they looked so pretty.   The next problem was which ones to buy, they come in three different types, plastic, metal and wood.  In the end I decided to buy one pair of each type and 3 cables, these arrived in the post yesterday.


The look wonderful but I was surprised at the cable lengths, the shortest one was a lot shorter than I had thought but that's not a problem.  Putting the cables on is easy they just screw in, there's also a hole for a "key" to go in to help tighten it up (I say key but its really just a bit of wire).   Each cable comes with end caps so that the needle tips can be removed and the caps put on so that your knitting doesn't fall off, I reckon these would work as stitch holder too.

So bearing in mind my little wench was around I couldn't do a proper test right away but I did manage about 5 mins with each type before she decided to help.  I cant quite put my finger on it but I didn't like the acrylic ones, maybe cos they squeaked or maybe they felt too light, not sure.  The metal tips were ok but were quite pointy, and I use my finger to push on the point sometimes so this bothered me.  The wooden ones, they didn't actually feel like wood, I liked these.

So my initial thoughts were that I liked either the wood or the metal but I was leaning towards the wood.  However someone on-line warned me that the acrylic ones needed to be used for a while before deciding as they had a coating on them.  So I grabbed some scrap acrylic yarn and started a stocking stitch sample and did about an hour or some with the acrylic tips,  that took me until the end of the Wench's nap.  Last night I got the metal tips on and managed about half an hour before my impatience got the better of me so I switched to the wood ones.

When I look down at the sample its a lot neater than normal,  an awful lot, so much so I was very very happy.  If I'm honest this could be for a few reasons, the new needles, that I have finally found "my" way of purling.  I don't care though my knitting with all 3 tips was consistently neat and even so I would happily use all of them for that reason.  The thing is I want to buy a deluxe set of these so I need to figure out which ones I love best and it still looks like the wooden ones.  Don't get me wrong, I could happily knit with all three types, but for me the plastic feels too plastic-y and the metal is just a bit too pointy.  This isn't me saying they are bad its me trying very very hard to find any reason, and I mean even a tiny one, to pick one over the other.  I'm quite sure that I would get used to the points on the metal tips and the plastic would be fine once I had used them a while.

So I'm still left not sure which set to get,  if there isn't much in it then I may just get the acrylic set for now and save up for the wooden set, especially as the wooden ones are the most expensive.  However if my heart is set on the wooden ones then I'm best getting those.  Sigh!  The wooden set would be about £50 plus postage and the acrylic set would be about £30 for the pink set and £35 if I wanted the rainbow acrylic set.

So what am I going to do?  Right now I'm going to buy wool so I can be doing something, and as I'm buying Stylecraft that should be a good amount of wool.  After that I reckon I will save up for the wooden set but slow time, right now its not essential as the set I have will do me for a while.  What I might actually do is buy some more cables, cable connectors and maybe one set of dpns inn 4mm so I can make an attempt as silvers sock class using DK wool.

Oh and just to throw something else in they do a special edition rose wood set thats about £70-£80 depending where you look :)

Friday, 17 September 2010

Join As You Go Squares - Part 2

I managed to join 4 granny squares together this morning but had to go do some chores.  So after I came back and tried to recreate what I did, here it is.

make a two row granny square as pictured below :)  i have chain 2 in my corners.


We now start a second granny and work round 2 until we get to the first corner, work 3DC and a chain 1 into that corner then stop.  We are now going to start connecting it to the first granny


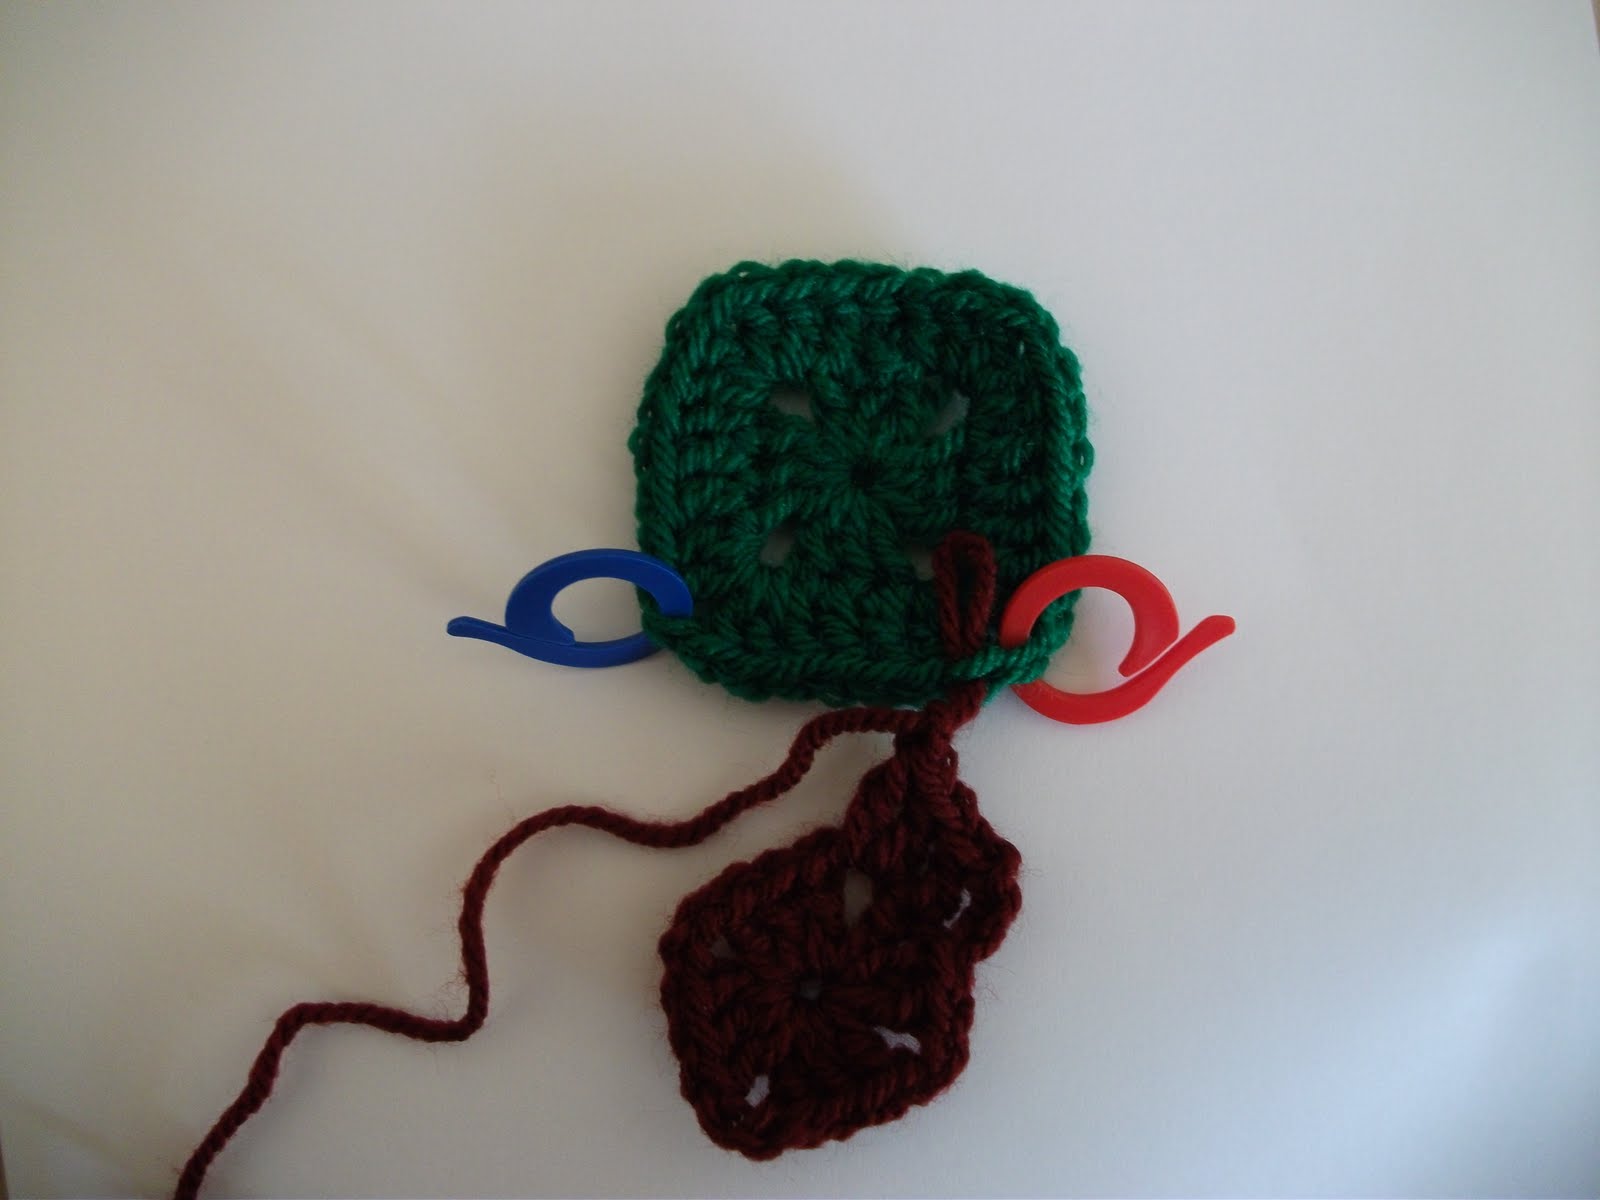
This next picture shows where we need to start connecting, length the loop on your hook so it doesn't get lost, then remove your hook from this working loop.  Insert you hook through the top-most loop of the chain closest to the 1st DC on the side we are going to be joining as in the picture below.  In this picture we are joining from the red stitch marker to the blue one. 


when you have the hook there, pick the working loop back up and pull it all the way through the chain loop on the first square.  I call this connecting the loop, its how you join every stitch to its opposite.


Now you chain one and again lengthen the loop on your hook and remove it.  Insert your hook, as before through the top loop of the first DC on the side we are connecting and pickup the working loop and pull it through, ie connect the loop as before.  Now you can yarn over and make a DC into the corner space of square number 2 as you normally would.  The picture below shows where we are so far.


You should be OK now to connect the loop to the top of the next DC and then make a second DC into the corner space.  Then again for the third DC in the corner of square 2, remembering to connect the loop before starting each stitch.  This next picture shows 3 DC connected and the loop is connected ready to make a chain 1.


when you get to a chain space, connect the loop as before to the top loop of the chain on the 1st square then chain one, then connect the loop to the top of the next DC before carrying on.   Every DC and every chain is connected to its mirror on the first square.


Now we get to the corner, connect the 3DC that form the first part of the second corner as you have been doing.  Now connect the loop after making the 3rd DC through the loop of the first chain in the corner of square one then chain one.  Don't chain any more than one, seriously :).  Now you can continue to finish the second square as normal as that was the only side we were connecting.  you should have something that looks like the squares below, as if you whip stitched them together.


So to try and summarise, connecting on one side, after 3dc chain 1 on square 2:

  • drop the loop and connect it the the chain next to the 1st dc, then chain 1
  • connect this loop to the 1st dc on the 1st square, then dc in corner or sq2
  • connect loop to 2nd DC in 1st square and make a 2nd dc in the corner of squ2
  • connect loop to 3rd DC in 1st square and make a 3rd dc in the corner of squ2
  • connect loop to chain and chain 1
  • connect loop to 1st dc in next cluster on square 1 and make a dc in appropriate place on sq 2
  • connect loop to 2nd dc in next cluster on square 1 and make a dc in appropriate place on sq 2
  • connect loop to 3rd dc in next cluster on square 1 and make a dc in appropriate place on sq 2
  • connect to chain on square 1 and chain 1
  •  carry on as normal to complete the square
I am going to jump ahead and join a 3rd square on as it just the same as we just did. Begin the 4th square as you did the last two, get to the first corner on round 2 and begin connecting it as you have been along the side from the red marker to the centre.


When you get to the centre you should connect the first 3 DC's that form the corner of square 4 as you have been already, then again connect the loop to the chain on the square you have been connecting to and chain 1 (same as you did before).  now on the next square you are connecting to there should be a chain available just prior to the first Dc you will be connecting to.  I want you to connect to that chain and chain 1, then you should be able to carry on connecting this second side as you have been doing and finish off to complete the last square. 


The above pic shows where i was after i connected the chain on the first side and i have pulled the working loop through the chain on the second side.

The last picture shows a completed join of four squares, i love how neat this looks :) it lays nice and flat.

Thursday, 16 September 2010

Join As You Go Squares Part 1

I've been pondering how to make a large throw with lots of squares in it, each would be made in the round and only be two rounds big.  This has headaches due to the seaming of the squares and ends to weave in.  When posting on Crochetville someone said that Join As You Go (JAYG) methods didn't just have to be connected at the corners and chain spaces.  I went away and tried something, it seems to work so here it is.

This doesn't have to be two round squares, they can be any size you want them to be.  I reckon you could use this in other places too I just haven't thought about it yet.  As I'm moving shortly I wont be able to post more than one way at the moment.

US Terminology
Hook used - 4mm
Yarn Used - scrap dk acrylic

Round 1
I start with a magic ring, but you don't have to, so into the ring, chain 3, dc, (chain 2, 3dc) 3 times, chain 2, 1 dc into the ring, ss to top of chain 3 to end the round.  Thats the start of your average granny square.

Round 2

chain3, dc in next dc, * (2dc, chain1, 2dc) in corner space, dc in each of next 3 dc * repeat from * to * 3 times, then (2dc, chain1, 2dc) in corner space, dc in next dc, Slipstitch in top of chain 3 to close the round.  fasten off and weave in your ends.


Second Square - Joining on One Side

Now, start a second square by completing round one as before, then begin round 2 with chain 3, dc in next dc, 2dc chain 1 in corner space.

Here is where it gets interesting, on the first square there are 7 DC's along each side with a chain 1 in the corners.  To show where we are starting to connect I have put 2 stitch markers in 2 adjacent corners in square number 1 (below).  Also in the picture below is a sewing needle, pay close attention to where it's placed.  It positioned under the uppermost loop of the DC to the left of the 1st stitch marker (in my case it's a red marker).


We will be joining from the red marker to the blue one.  At the moment you have just made a chain 1 on the second square, length this loop (the working loop) so you dont loose it, and remove it from your hook.  Now insert your hook in the same way the needle is in the above picture, from top side in a downwards direction through the topmost loop only of the stitch to the left of the red marker.  Now pick up the working loop you dropped a moment ago and pull it all the way through the loop of the first square as shown below.


What we did just there, by pulling the working loop through a loop on the first square, from here on I'm going to call this "connecting the loop".  This is the key to this method and I hope I have explained it ok.  If not I will come back and take more pictures etc to try and help.

If you lengthed that loop now is the time to pull it back to normal size, you can now yarn over and make a DC in the corner space of the second square, just as you normally would.  Before you go and make the required second DC in the corner space connect the loop on your hook to the next available loop on the first square (top loop only) in the same way as before.  Once you have connected the working loop you can make the second DC in the corner space of square 2 shown below.


The above picture shows two stitches connected and the working loop is connected ready to make another DC.  If you got this far you should be able to carry on to the end of this row, connecting each stitch as you go.  You shoud find the there are 7 loops between the two stitch markers on square one and 7 DC's to be made on square 2, four of those DC are in corner spaces.

When you get to the next corner you are connecting the 2 DC's that form the first part of the corner to the first square, but before you carry on to finish the rest of the square you have to do somthing first.  After you make the second DC into the corner space of square 2 (having connected the loop first) you need to connect the working loop to the one that the blue stitch marker is sitting on, the chain 1.  So remove the marker, drop the working loop and pull it through the top loop of the chain in the corner of square 1.  Now you can chain 1 and complete the rest of square 2 as normal, from here its 2dc in the corner space.......etc......as normal with no connecting loops as we were only connecting one side.

What you should have now is somthing that looks like the picture below, it looks like you whipstitched them together, neah eh?


Joining More Squares On

Right now you can go ahead and make a 3rd square and attach it to one side of the 2nd square to form a L shape.  To join you simply do the same process as you just did, theres no difference, just pretend the other square isnt there.  Dont forget after joining the top of each DC to attach the working loop through the chain 1  before finishing the rest of square number 3.

When you come to join square number 4 on, you start as you did before and join from the red marker towards the centre in the picture below.


The first part about joining the fourth square is the same as you did before, join each DC along to its opposite and the last working loop through the chain 1 in the square you are joining to.  Before you carry on and join the last side remove the working loop from the hook and connect it to the top loop of the first DC along the next side you are joining to.  Now you can complete this side, connecting the loops as you have been.  when you get the end of this square  you should have something like the picture below.


I did mean to take more pictures of this but forgot.  If what i have written isnt enough to help you understand i will do another set with lots more pictures.

I realy really like this joining method, theres no ridge which you get when you join granny squares as you go.  This means it lays flat, its also very neat and doesnt involve much extra effort once you get the hang of it.  I like no having to sew the squares together and thus not having extra ends to weave in.

Iwould realy appreciate it if someone tried this out, I'm sure theres a better way of doing those corner joins.

Please let me know if i need to expand this or anything else for that matter.

Thanks

Thursday, 2 September 2010

Granny Stripe

My Father in Law is ill and has been diagnosed with a couple of things so I decided to make him a blanket.


So I'm using Stylecraft DK, colours listed below:

Top Row - Walnut - Copper - Graphite - Khaki - Green
Bottom Row - Meadow - Camel - Denim - Mocha

I began with a row of foundation single crochet and the Granny Stripe pattern from Attic 24, after some adjustments it ended up being 40 inches wide.  When I got through all my colours I decided that the green just didn't fit, so I am missing it out.


I am loving my colours and the lovely pattern by Lucy :)

Have Fun